3.5m linen fabric 3D scanner 2 bottles of Rit Dye in Navy blue 2 Lace front wigs + additional lace 1 sheet 2x1m 10mm High-density EVA foam 1 sheet 2x1m 5mm High-Density EVA foam 1 sheet 1×0.5m 2mm High-Density EVA foam Acrylic paints Hexflex clear coat Real pumpkin gourd Wood stick + wood varnish Worbla 3D SLA and PLA print 3mm/5mm macrame cords
2 pcs. Smooth-on Mold Star 15 1pc Smooth on Dragon Skin Silc pig silicone pigment Monster Clay PVC pipe insulation Wire Velcro Safety pins Leather Thermoplastic beads Silicone chest Punching needles Different types of glue Various Softwares
Total cost of materials: 2000 BGN (appx. 1000 EU) Estimated work time on the costume: 2 months
Prosthetics
Detailed process on the prosthethics
Creating the prosthetics for Wukong involved multiple detailed steps.
To accurately sculpt the prosthetic for my face, I needed precise measurements. I acquired a 3D scanner and made an accurate scan of my head. After cleaning up the scan in Blender, I exported it as an STL file and proceeded to the printing stage.
Printing took approximately 35 hours, resulting in a one-to-one model of my head for the next steps.
Using Monster Clay, I sculpted the design, finalizing and adding all details over one and a half days. Once the sculpt was ready, I wrapped it in foil to mark the placement of the hair. After removing the foil, I refined the surface with more tools to make it more realistic.
Then it was time to create the mold.
For the mold, I used Smooth-On’s Mold Star, a platinum silicone that cures in about four hours. I prepared a bedding for my head and mixed the silicone in a one-to-one ratio. Using normal clay, I built housing around my head to use less silicone while achieving a good result. Before pouring the silicone, I applied a release agent to prevent the silicone from sticking to the 3D-printed head. After four hours, the silicone mold was ready.
For the cast, I used Smooth-On’s Dragon Skin in a one-to-one ratio, mixed with silicone pigment to give the cast a flesh-like appearance. I secured the casting with my 3D-printed head after removing the Monster Clay. After five hours, I had a well-formed prosthetic cast of my sculpture. The final part involved cleaning up the cast and punching all the hair in.
Hair
Wig work
For the wig, I started with a basic long lace front wig that matched the character’s fur color. I then trimmed all the wefts to a shorter length.
Using a steamer, I pushed the hair so the base would point upward instead of downward.
After shaping the base, I teased the hair and styled it to reduce messiness and create spiked ends. To address the bald spots, I glued additional hair strands to fill in the void spaces.
Chest and hair
For the chest, I bought a full male torso so I can get as close to the original as possible.
Due to the nature of the costume, I needed to add hair to the front of the silicone torso. I used hair punching needles in different sizes to create a burly look on both the front and the back of the neck.
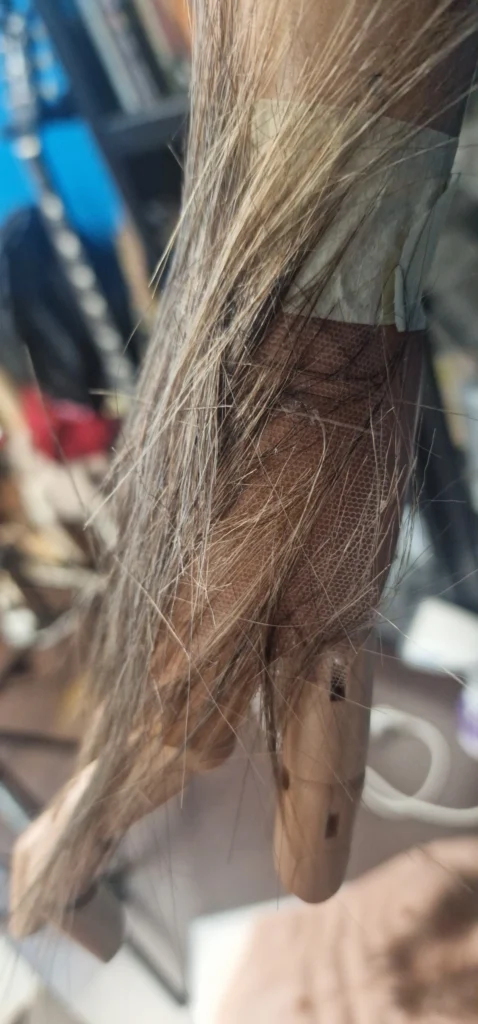
Hands and legs
I used the same techniques for both of the hands and feet. I cut a piece of lace for wigs, placed it on the mannequin limb and started gluing down strands of hair with a transparent shoe glue. Then I trimmed the excess hair to make it look more natural. They are attached to my body with a spirit gum.
Tail
I used strands from wigs I purchased for all the monkey hair parts, including the hands, feet, tail, and chest. I sectioned the wig, cut off parts, and glued them together, making small partitions for layering.
I used PVC pipe insulation with garden wire at the core for the tail to keep it secure and make the shape. I had to secure the tip with some eva foam and duct tape, making a nice rounded shape. I covered it with a sock made from leftover stretchy fabric. I then glues about 70 strands of hair positioned carefully in layers to achieve a realistic animal tail. Then I had to trim the excess hair and spray it with some hair spray. Using lightweight insulation allowed the tail to articulate nicely without being too heavy. It is attached to the pants with a large safety pin.
Garments
For the costumes of Wukong, I wanted to create a believable garment.
This is why I turned to historic costumes and their usage.
I spend a couple of days researching the pattern and seeing the inspiration.
Later, I decided to go with my gut and incorporate as much as possible from what I learned. Zooming in and out, I tried to see the texture of the fabric on the 3D model/screenshots.
I used 100% linen fabric for all parts.
The first step was to prepare the fabric and wash it. Then I let it dry naturally.
For the patterns, I utilized a yoga pants pattern for the bottom and a Shaolin Gi pattern for the top. After printing out all the patterns on papaer, I connected them with tape, cut out all the shapes, transfered them to the fabric and proceeded with cutting them again.
Then I dyed the cutouts using a bottle and a half of Rit dye in hot water. I left the pieces to dry out naturally in the sun and stitched everything together with a straight stitch.
The belt is made from a large piece of linen, which I cut out, folded in half, and then stitched on my sewing machine.
The Gi collar is also a strap of cloth. The only difference is that I made 5 decorative straight stitches along.
I have also made two additional parts for my hands and ankles to hold a specific shape for the main garment. They are secured in place with ropes and leather straps.
Once I was satisfied with the clothes, I moved on to adding pigments. weathering with pigments will give the costume a more realistic appearance, rather than using regular paints/airbrush, which tend to give a more clean look. Since the game is all about fighting, I wanted the garment to look wornout and dusty. For the edges I used a very small and fine brush, I applied four different pigments in rotation. As for the bigger parts , I directly poured some pigment dust in several colors and started rubbing them onto the fabric to complete the final look.
Ropes and leather belts
For the ropes, I used approximately 10 meters of peacock blue rope from the brand bobbiny, braiding three sections each 5 millimeters thick to achieve the final look. I also bought one 3mm white rope from the same brand which I had to dye with the Rit dye and incorporate in the armor. Once I braided all of the ropes, I weathered them with the same pigments I used for the clothes.
For the leather belts, I utilized leftover leather from a previous project, stitched it on my machine, and attached Velcro to the pieces that needed to be connected. I made 4 belts – 2 for the hands and 2 for the legs. Additionally, I attached some belts to the armor, so I could wear them and match the overall style.
Armor
For the armor parts of this costume, I selected two kinds of EVA foam: 5-millimeter and 10-millimeter. To begin creating the pattern for the armor, I scaled the model reference on my computer and traced the design by hand on paper. Once completed, I scanned the hand-drawn design using my office scanner and converted the shapes into an Illustrator file.
With all the pieces in Illustrator, I began refining the model. This involved fixing lines, adding holes, and marking the areas for engravings. Once the file was fully prepared, I exported it for laser engraving and cutting. The process of engraving and cutting all the armor parts took approximately 17 hours. Significant time was spent adjusting the laser settings to ensure the engravings matched the reference used.
After the laser did its job, I began by sanding down the corners of each part to give them a finished appearance. I then washed the EVA foam with lukewarm water to remove all of the sanding dust and allowed it to dry. Using a heat gun, I removed any leftover foam residue and sealed the pieces with the heat.
Next, I heated up the EVA foam again and pressed on to it a crumpled tin foil ball to create a leather-like texture.
With the parts prepared, I marked the areas for battle damage using a marker. I then used a pyrography pen to create the damage. For coloring, I applied five different layers to achieve the final look:
A combination of Hexflex primer mixed with brown paint.
Asphalt lacquer accent
Dark brown layer with green undertone
Brick red layer
Light brown highlights
The penultimate step for the armor was to hand-stitch all the decorative stitches. For the final touches, I used the rope I prevously dyed with Rit dye, disassembled it to make it a bit thinner, and hand-stitched it onto the EVA armor..
Grommets were added and pressed down using my Matrix tool. Since they were way too shiny, I decided to weather them as well. I applied dark brown acrylic paint.
Additionally, I designed accessories in Blender and printed them on a resin 3D printer.
The armor connects via Velcro.
Nails
To create the nails for Wukong, I used thermoplastic beads melted in water and sculpted on top of my own nails for both the hands and feet. I painted them with acrylics and used nail glue/spirit gum to secure them when wearing.
Gourd
One of my favorite parts of the costume is the gourd. I could not find a good reference on it, so I used a screenshot from one of the gameplay trailers, which showed the color and the accessories on the gourd.
I bought it from a local seller. Luckily we still have people producing gourds in Bulgaria.
I began by soaking the gourd in lukewarm water. Then I began washing and sanding down the gourd, since I had to remove all of the dirt and moss of the shell. Then I left it to dry naturally for 30 minutes.
Once it was ready, I moved on to painting.
Using a Dremel metal cutter, I made the incision and removed all the seeds. I created a detailed cap using Worbla, which I then painted with acrylics.
Monkey King staff
For the Staff of Wukong, I used a two-meter-long, four-centimeter-wide piece of wood.
I marked off the staff to cut it to match my height, using a circular saw for the cutting. Once the cut was complete, I sanded the entire staff to ensure the wood was primed and ready for the next steps.
To create the shapes on the staff, I began by scaling up the model and sketching the designs by hand directly onto the staff. With the design in place, I moved on to using Worbla. I utilized both black Worbla and the standard one due to a limited supply.
The next step was painting the staff. I applied wood lacquer, which required about three coats to achieve the desired rich red color. After that, I mirrored the design on the other side of the staff and painted all the shapes in black to create a uniform appearance.
The final details included adding small rivets. I designed them in Blender, printed them on a resin 3D printer, primed and painted them with black acrylics, and then attached them to the staff with glue.